
Hello there guys!
After disneyscreencaps.com had to take down all screencaps of डिज़्नी फिल्में they had,
many people don´t know where they can get high quality screencaps for their editing, आइकन and crossover making needs.
Don´t worry, i´m here to help ;)
This tutorial will दिखाना आप a very easy way on how to take your own screencaps with the "VLC Media Player".
Let´s start!
Step 1
Get the VLC Media Player, if आप don´t have it already.

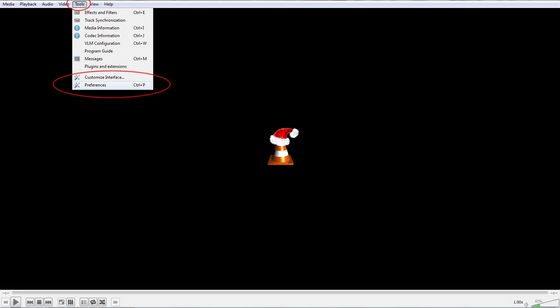
Step 2
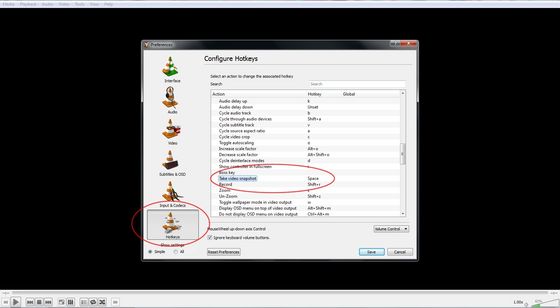
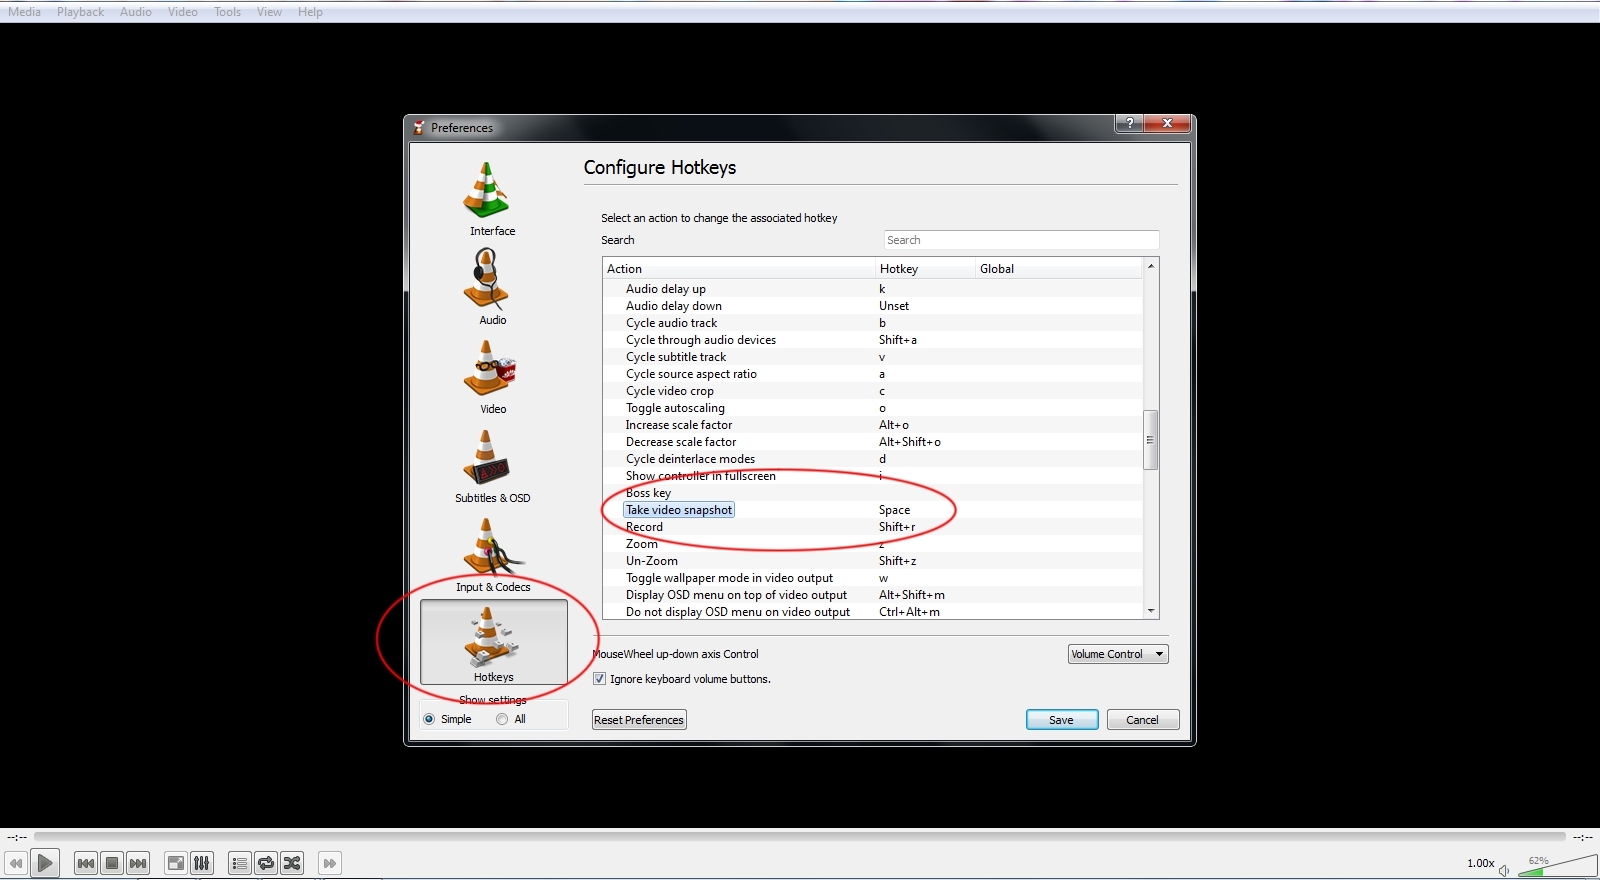
Open it, click on "Tools" and go to the "Preferences".
Step 3
A new window with the preferences will open.
Click on "Hotkeys" and find the command "Take video snapshot".
Double click on "Take video snapshot" and another small window will open.
Like it will say, press any key या keys आप want to take screencaps with.
I choosed "space", because it seemed the easiest key to press ;)
It is possible, that the key या keys आप want are taken for another command!
Find the command which uses it/them and change it to something else, then go back to the "Take video snapshot" command and change it to your prefered key या keys :)
Step 4 (optional)
Go to "Video"
आप can decide where your screencaps will be saved, which format they will be in and how they will be called.
For the format - png is always a good way to go.
For the prefix - if आप want to make your life easier, आप can, for example -
If आप want to take screencaps from Pocahontas,
write "Pocahontas" and choose the option "Sequential numbering". If आप do that all your screencaps will start with "Pocahontas" and will be followed द्वारा a number (Pocahontas00001.png).
I normally only have the "Sequential numbering" option on, without a text. If आप do that, your screencaps will be named "vlcsnap-00004.png" (for example).
(Don´t write the " ", those are only to make it stand out more)

Step 5
Save! The button is in the bottom right corner.
Then, close the VLC Media Player!
Seems stupid, but all the changes आप made will only be used the अगला time आप open the player.
Important!
If आप write something down for your screencaps names, it will stay the same until आप change it!
So if आप don´t want your "Little Mermaid" screencaps to be named after Pocahontas, आप will have to change it again and close the player before taking them.
Step 6
Open the video आप want to take screencaps from!
Once आप see a screen आप want to take, press the key या keys आप decided to use aaaaaandd....

There आप go! आप just took your first screencap :)
Find the folder आप choosed to save your screencaps into and have fun with them!
The good thing about this way is, that it doesn´t matter if आप make the VLC window/the video smaller while taking the screencaps.
They will always be in the size and quality, the video normally has :)
I hope आप understood everything i explained, if not -
write your सवाल down in the comments, so everyone can see them and so i can संपादन करे the लेख faster (if i need to).
That´s it for now, bye guys and have fun!
After disneyscreencaps.com had to take down all screencaps of डिज़्नी फिल्में they had,
many people don´t know where they can get high quality screencaps for their editing, आइकन and crossover making needs.
Don´t worry, i´m here to help ;)
This tutorial will दिखाना आप a very easy way on how to take your own screencaps with the "VLC Media Player".
Let´s start!
Step 1
Get the VLC Media Player, if आप don´t have it already.
Step 2
Open it, click on "Tools" and go to the "Preferences".

Step 3
A new window with the preferences will open.
Click on "Hotkeys" and find the command "Take video snapshot".
Double click on "Take video snapshot" and another small window will open.
Like it will say, press any key या keys आप want to take screencaps with.
I choosed "space", because it seemed the easiest key to press ;)
It is possible, that the key या keys आप want are taken for another command!
Find the command which uses it/them and change it to something else, then go back to the "Take video snapshot" command and change it to your prefered key या keys :)
Step 4 (optional)
Go to "Video"
आप can decide where your screencaps will be saved, which format they will be in and how they will be called.
For the format - png is always a good way to go.
For the prefix - if आप want to make your life easier, आप can, for example -
If आप want to take screencaps from Pocahontas,
write "Pocahontas" and choose the option "Sequential numbering". If आप do that all your screencaps will start with "Pocahontas" and will be followed द्वारा a number (Pocahontas00001.png).
I normally only have the "Sequential numbering" option on, without a text. If आप do that, your screencaps will be named "vlcsnap-00004.png" (for example).
(Don´t write the " ", those are only to make it stand out more)

Step 5
Save! The button is in the bottom right corner.
Then, close the VLC Media Player!
Seems stupid, but all the changes आप made will only be used the अगला time आप open the player.
Important!
If आप write something down for your screencaps names, it will stay the same until आप change it!
So if आप don´t want your "Little Mermaid" screencaps to be named after Pocahontas, आप will have to change it again and close the player before taking them.
Step 6
Open the video आप want to take screencaps from!
Once आप see a screen आप want to take, press the key या keys आप decided to use aaaaaandd....

There आप go! आप just took your first screencap :)
Find the folder आप choosed to save your screencaps into and have fun with them!
The good thing about this way is, that it doesn´t matter if आप make the VLC window/the video smaller while taking the screencaps.
They will always be in the size and quality, the video normally has :)
I hope आप understood everything i explained, if not -
write your सवाल down in the comments, so everyone can see them and so i can संपादन करे the लेख faster (if i need to).
That´s it for now, bye guys and have fun!